Page 1 Go to Page 2 . Go to Page 3 . Goto Page 4 . Goto Page 5
|
Bass 5 A fretless 7 string chambered Headless
|
|
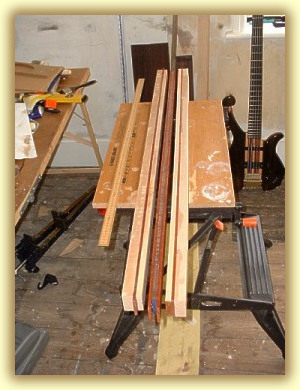
The final working drawing was planned out full size on the back of a cheap roll of wall paper. Next, I selected which laminates to use and which way around they were to go. Then I plained down each laminate (nine in total) to exact sizes. I then glued and clamped 1/4" Paduak laminates either side to the 1/2" Walnut centre, with a black veneer between them. this time I took a leaf out of David King's book (BGS) and I scored the planks with an old knife blade to help the adhesion. I used my tried and tested choice of wood glue (normal white PVA) and Then I set it aside to dry for a week. Next I plained the top and bottom. |
This cool shot shows the how I made 3 smaller laminates which I then glued into one BIG laminate. Next I glued up 2 lots of 1/4" Paduak and 1" Maple. These I also set aside to dry for a week. After which, I plained the top and bottom. The following week I mated the two lots of Maple/Paduak either side of the centre piece. I did this to break down the glueing into 3 equal part which allowed me to keep a tight control over the quality of the joints. (Trying to glue nine laminates and 4 veneers, spanning 4.5" with only 2m/m maximum slipage isn't going to happen with the equiupement I use!) While this was setting, I plained the Wenge boards flat and true. Then I glued them together to create a nice wide board to make the 1" body core. Once Set and allowed to dry for a week, I hand plained the huge neck blank. I took me a whole morning and beats a workout any day. I will probably run it though a plainer thichnesser later, to get a better top surface. I then set about planning and marking out the cutting lines on the neck blank. This was very tedious but It needed to be done right if I was to avoid some of the mistakes I had made with my 5 string headless. I find that headless basses need much more carefull planning than headed basses. There is less wood involved (I hope to yeild 2 basses fron the one blank-you don't get that from headed basses) but the component placing, heights and angles are a lot more critical. The headless bridges tend to have a lot more travel for intonation than more traditional bridges, but I still managed to place it 10m/m too short on my Project 2 bass. Thankfully it still intonates well! The neck was then cut out on a band saw. It is really hard to accurately saw 4.5" of hardwood but I managed a fairly decent job. I always allow myself a good margin of error anyway. I like to take the neck profile down by hand with a spoke shave. It is time consuming but is very satisfying and as I pour my time over it I can get it right. After various experiments with neck profile I have settled with a flat back style. I have tried various: Bass 1 was chunky, Bass 2 was asymetric, Bass 3 was thin and narrow and bass 4 was as thin as was realistic but with a flat back and a 1/2" radius either side. This style I find the most comfortable and I notice that the new range of Status-Graphite basses use a simular variation of this profile - cool. The hollow chambers for this bass will be built in the same way that I did for Project 2. I took a centre piece of wood and cut it's shape out on a band saw. Then I penciled a 3/4" line inside this line and cut out the centre on the band saw. This is less messy than routing and quicker, but it is harder to cut the tight radius. The control cavity will need to be made, a router will be the best tool for this. The sides will need to be smoothed. Then I will glue the maple and cocobolo laminates (one at a time) and cut out the the centre of the maple and outside shape using a veneer routing bit. The Wenge board in a little under 1" so I will pad out the thickness with a few veneer coachlines. Cocbolo 1/4", maple veneer, mahogany veneer, 1/4" Maple, mahogany veneer, maple veneer, Wenge etc. After the two bodies have been laminated, the joining faces will be sanded absolutely flat and prepared for joining. This time, there will be photos!
Sortly after this shot was taken, I totally walpapered my Son's room - long over due.. |
|
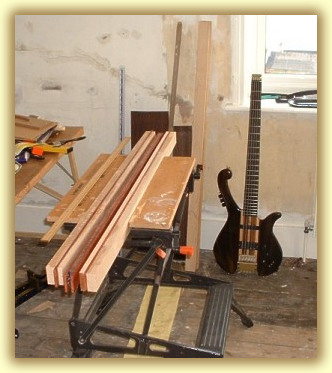
As you can see, my Son's bedroom decorating hasn't progreesed any further since my last bass!
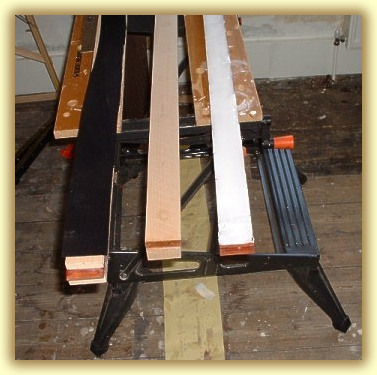
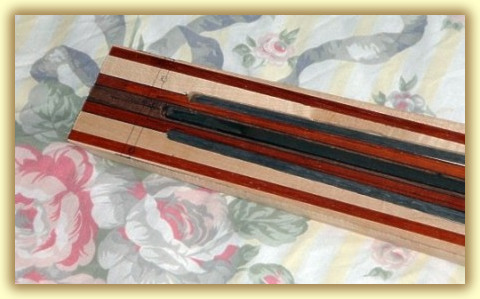
If you look closely at the centre maple plank, you can just make out the cross-hatch score marks.
Here you can see the centre being glued and clamped to the side laminates.
A nice shot showing my headless 5 string in the background which I have used to check a lot of the dimensions.
Here you can easily see the black veneer strips. |

|
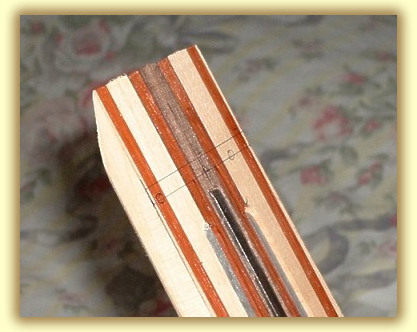
Careful and acurate
marking is neccessary to make a good bass and thi seven stringer needs
even tighter tolerances. In this picture you can see the marked out
fingerboard and how much it tapers. The end 1/4 is the underside of
the 2nd neck blank
|
|
|
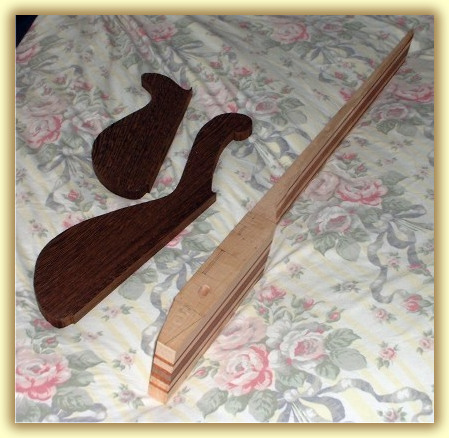
I have managed to get 2 necks from this one blank by top and tailing them. Which is a nice surprise. What do I do with the spare one? It looks like I'm going to have to build a sister. |
|
|
After I had cut out the neck profile (and separated the two neck blanks). Then I re-drew all the relevant dimensions back onto the top and then I cut the neck angle and thinned the centre body thickness. I cut out the neck profile very carefully on Dave's Bandsaw. It was very slow trying to cut 4 ½" of laminated hardwood. I found than 1 m/m per sec was about the fastest cut.
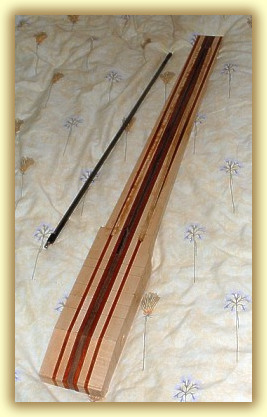
The carbon rods have a dark slate gray colour. These will not be seen because the fingerboard will cover them. Speaking of which I have just taken delivery of a splendid piece of Indian Rosewood which is mega wide (4 1/2"). |
After cutting out the profile (I used similar neck depth to my 4 string fretless project - this will be a really thin neck), I sanded down the underside of the neck. I allowed 1½" past the end of the fingerboard for the end cap. Originally I was planning to take a "Status" 6 string and combine it with a 5 string end cap to make the 7 string unit. As a result I made the end of the neck suitable for one of Rob Green's units. Then I got in contact with David King of BGS, who very kindly offered to make me a 7 string version of his end cap. His design (which he has been perfecting for several years) is an evolution of the steinberger idea. But using a set screw to hold each string. (I have no chance of finding a 7 string double ball set any how!) David's design is very neat and compact. David uses it to terminate the end of the carbon rods and his truss rod nut is anchored here. A very novel idea and it cuts down his manufacture time. Check out his web site in my links page.
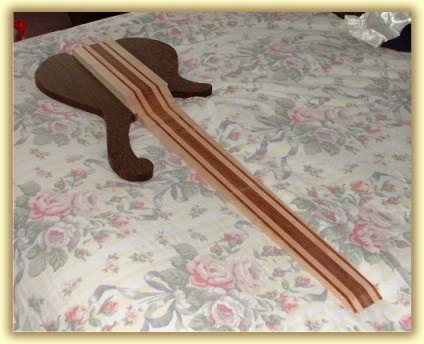
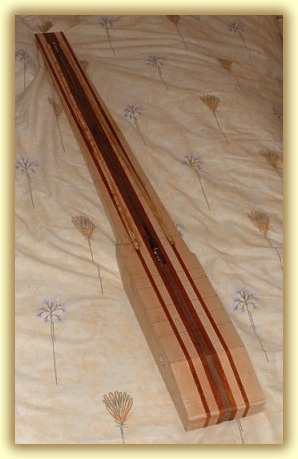
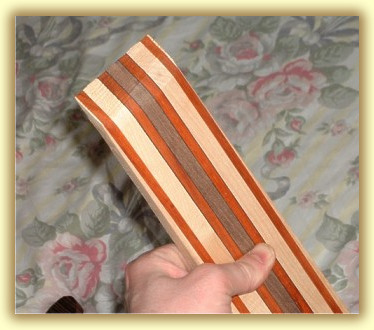
The Paduak contrasts the maple and Walnut nicely. I will use a flat profile for the shape of the neck with simple radiused edges. The laminates have really glued well and they have the appearance of a single piece of mulicoloured wood |
|
I then cut off the angle for the tuner blocks. This needs to be quite accurate so the tuners will sit evenly. I under cut it by a few m/m and tediously plained down the excess. With all the bits laid out like this, it's starting to look like a bass.
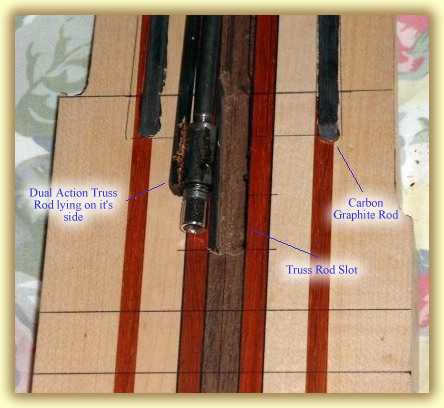
Then I plained down the joined Wenge boards, marked the shape line and cut them out. These turned out very well - a testament to the workability of freshly plained Wenge! It's a lovely wood to saw but smells horibble. Very stupidly I tapered the sides before I cut the truss rod and reinforcement rod slots…Duhh! To get around this I had to knock up some makeshift jigs to get a neat line. Unfortunately the router wandered a few times and the last 2" of the carbon rod slots had to be routed out free hand, so you'll notice that the slots are a little sloppy and uneven. My next job is to glue the carbon rods and fix the truss rod. |
|
|
I glued the Carbon rods into place with an epoxy resin and capped them over with a maple fillet. Next time I'll rout them to the correct depth! These maple covers were then planed flush to the top so that the fingerboard can be glued flat. I also glued in the un-adjustable end of the truss rod to fix it and prevent it from moving about in the slot. It also helps the rod to become a part of the neck structure. |
|